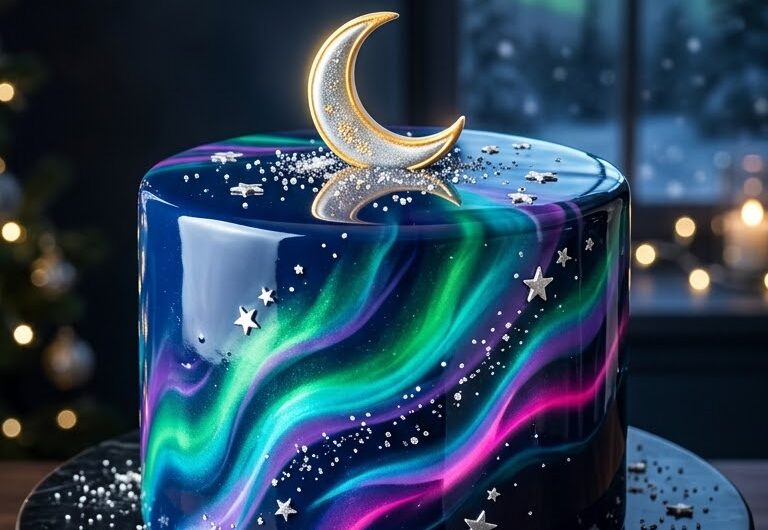


🌌 What Is an Aurora Borealis Cake?
Imagine bringing the Northern Lights down from the Arctic sky and turning them into a cake. 💚💙💜
An Aurora Borealis Cake is a dramatic celebration cake decorated with deep midnight-blue or black frosting and luminous swirls of green, turquoise, purple and sometimes pink or gold.
The sides can be finished with tiny edible stars, snowy mountain silhouettes and miniature evergreen trees to create the feeling of standing beneath the Northern Lights on a winter night.
Real Aurora Borealis cake designs commonly use swirling green-and-blue effects, starry details and mountain or pine-tree silhouettes to recreate the night-sky scene.
🍰 Why You’ll Love This Cake
✨ Looks like a piece of the night sky
💚 Gorgeous green and turquoise aurora effect
💜 Beautiful purple and blue galaxy background
⭐ Covered with tiny edible stars
🌲 Can be decorated with snowy mountains and pine trees
🎂 Perfect for birthdays and winter celebrations
📸 Extremely photogenic for Pinterest and Instagram
The design can be created with buttercream rather than requiring a complicated mirror glaze, making it more approachable for home bakers. (CakeWhiz)
🛒 Ingredients
🍫 For the Chocolate Cake
- 2 cups all-purpose flour
- 1¾ cups granulated sugar
- ¾ cup unsweetened cocoa powder
- 2 large eggs
- 1 cup milk
- ½ cup vegetable oil
- 1 cup hot water
- 2 teaspoons vanilla extract
- 1½ teaspoons baking powder
- 1 teaspoon baking soda
- ½ teaspoon salt
🌌 For the Aurora Buttercream
- 1 cup unsalted butter, softened
- 4 cups powdered sugar
- 2–3 tablespoons milk or cream
- 1 teaspoon vanilla extract
- Pinch of salt
Gel colors
- Black
- Navy blue
- Royal blue
- Emerald green
- Teal
- Purple
- Optional: pink
Use gel food coloring for stronger shades without adding too much liquid.
⭐ For the Decorations
- White royal icing
- Edible silver stars
- White sprinkles
- Black or dark chocolate
- Green fondant
- White fondant
- Edible glitter, optional
- Mini pine trees, optional
- Small amount of powdered sugar for a snowy effect
A published Aurora Cloud Cake technique similarly uses blue fondant, star sprinkles, colored airbrushing and white royal-icing clouds to create a Northern Lights-inspired effect. (Cut Out And Keep)
🍫 Step 1: Bake the Chocolate Cake
Preheat your oven to 175°C / 350°F.
Grease and line two round cake pans.
In a large bowl, combine the flour, sugar, cocoa powder, baking powder, baking soda and salt.
Add the eggs, milk, oil and vanilla.
Mix until smooth.
Slowly add the hot water and mix until combined.
The batter will be relatively thin—this is normal.
Divide between the prepared pans.
Bake until a toothpick inserted into the center comes out clean.
Allow the cakes to cool completely before decorating.
🧁 Step 2: Make the Buttercream
Beat the softened butter until pale and fluffy.
Gradually add the powdered sugar.
Add vanilla and a little milk or cream.
Continue beating until the buttercream becomes smooth and spreadable.
You want a frosting that’s firm enough to hold the colorful aurora streaks.
🌌 Step 3: Create the Midnight Sky
Reserve some white buttercream for later.
Color most of the remaining buttercream with navy blue and a small amount of black.
Don’t make the frosting completely black.
A very deep blue gives the cake more dimension and allows the green and purple aurora colors to glow against it.


🎂 Step 4: Stack the Cake
Place the first cake layer on a cake board.
Spread a layer of buttercream over the top.
Add the second cake layer.
Cover the entire cake with a thin crumb coat.
Refrigerate until firm.
Then add a thicker layer of dark blue buttercream.
Smooth the sides, but don’t worry about making the surface absolutely perfect—the aurora effect will cover much of it.
💚 Step 5: Make the Aurora Colors
Divide some buttercream into small bowls.
Create:
💚 Emerald Green
For the brightest aurora glow.
🩵 Turquoise
For the luminous center.
💙 Electric Blue
For depth and transition.
💜 Purple
For the magical outer glow.
💗 Pink
Optional, for a more colorful aurora.
The classic visual language of Aurora Borealis cakes often combines deep blue with luminous green and additional purple or pink highlights.
🌈 Step 6: Paint the Northern Lights
This is the most exciting part!
Using a small offset spatula or soft food-safe brush, apply thin, curved ribbons of green, turquoise, blue and purple buttercream across the cake.
Don’t make straight lines.
Instead, create:
〰️ flowing curves
🌊 gentle waves
↗️ diagonal streaks
🌀 soft swirls
Blend the edges gently while keeping the colors visible.
Important: Don’t completely mix the colors together.
You want distinct luminous ribbons, not muddy green-purple frosting.


✨ Step 7: Create the Glowing Aurora Effect
For the brightest part of the aurora, place a thin ribbon of white or very pale turquoise buttercream underneath a green or teal streak.
Then gently blend only the edges.
This creates the illusion that light is glowing from inside the cake.
A good color sequence is:
Dark Blue → Turquoise → Pale Green → Emerald Green → Purple
The brighter colors should remain relatively narrow compared with the dark background.
⭐ Step 8: Add the Stars
Now turn the cake into a night sky.
Use a small amount of white royal icing or melted white chocolate to create tiny dots.
Add edible silver or white star sprinkles.
Make some stars tiny and a few slightly larger.
Avoid making them evenly spaced.
A random distribution looks much more like a natural night sky.


🌲 Step 9: Create the Snowy Mountains
This is what can take the cake from a simple galaxy cake to a true Aurora Borealis landscape.
Create dark mountain silhouettes around the bottom edge.
You can use:
- Dark chocolate
- Black fondant
- Black buttercream
- Modeling chocolate
Add small white highlights to represent snow.
Create several peaks of different heights.
Then add tiny evergreen trees between the mountains.


🌙 Step 10: Add a Moon
For an extra magical finish, add a small crescent moon.
You can make it from:
- White fondant
- Yellow fondant
- White chocolate
- Modeling chocolate
Place it slightly off-center on the top of the cake.
A crescent moon with tiny pine trees creates a beautiful Arctic-night scene, a design approach also seen in Northern Lights cake inspiration.
❄️ Step 11: Create a Snowy Cake Top
For a winter version, cover part of the top with small white buttercream peaks.
Dust very lightly with powdered sugar or edible shimmer.
Add a few miniature pine trees.
Now the cake looks like a snow-covered Arctic landscape underneath the Northern Lights.
🌌 The Final Aurora Borealis Cake
When everything is finished, you should have:
🌌 Deep midnight sky
💚 Glowing green aurora
🩵 Turquoise light ribbons
💜 Purple highlights
⭐ Tiny stars
🌲 Dark pine trees
🏔️ Snowy mountains
🌙 Optional crescent moon

🎨 5 Aurora Borealis Cake Design Ideas
1. 💚 Classic Northern Lights
Deep navy frosting + emerald green + turquoise + white stars.
Best for: Elegant birthdays.
2. 💜 Purple Aurora
Blue + violet + magenta + pink + silver stars.
Best for: A magical fantasy theme.
3. ❄️ Arctic Winter
Green aurora + snowy mountains + pine trees + crescent moon.
Best for: Winter parties.
4. 🌌 Galaxy Aurora
Add deep purple, electric blue and tiny edible glitter.
Best for: Space-themed celebrations.
5. ✨ Luxury Aurora
Use dark navy frosting with subtle green aurora ribbons, gold stars and metallic gold details.
Best for: Elegant adult celebrations.
💡 Tips for a Realistic Aurora Effect
Don’t use too many colors
Three or four well-blended shades usually look better than every color of the rainbow.
Keep the background dark
The aurora needs contrast.
Make the aurora asymmetrical
Realistic flowing ribbons look more natural than perfectly mirrored patterns.
Use different widths
Some light streaks should be thin while others are broader.
Don’t overblend
If everything becomes one color, you’ll lose the Northern Lights effect.
Add stars last
This keeps the stars bright and crisp.
🍰 What Flavor Goes Best With an Aurora Cake?
The outside can be dramatic while the inside stays simple.
🍫 Chocolate + Vanilla
Rich chocolate cake with vanilla buttercream.
🍫 Chocolate + Raspberry
Chocolate cake with raspberry filling and dark chocolate buttercream.
🍋 Lemon + Blueberry
A lighter option with lemon cake and blueberry filling.
🥥 Coconut + Chocolate
Perfect for a snowy winter theme.
🍓 Vanilla + Strawberry
A crowd-friendly choice for birthdays.
🎉 When to Make an Aurora Borealis Cake
This cake is perfect for:
- 🎂 Birthday parties
- ❄️ Winter celebrations
- 🌌 Space-themed parties
- 🧙 Fantasy parties
- 💍 Winter weddings
- 🎓 Graduation celebrations
- 🥳 New Year’s Eve
- ✨ Milestone birthdays
It’s especially effective when you want a cake that doubles as the centerpiece of the dessert table.
❓ Frequently Asked Questions
Is an Aurora Borealis Cake difficult to make?
The basic cake is straightforward. The decorating requires patience, but you don’t need advanced techniques if you use buttercream and create the aurora with simple curved strokes.
Do I need an airbrush?
No. An airbrush can create beautiful effects, but you can make the aurora entirely with colored buttercream. Published Northern Lights cake tutorials demonstrate both airbrushing and buttercream-based approaches. (Cut Out And Keep)
Can I use fondant instead of buttercream?
Yes. Fondant provides a very smooth surface and can be painted or airbrushed with aurora colors.
Can I make it without edible glitter?
Absolutely. Tiny white stars and a few dots of white icing are enough to create a beautiful night sky.
How far ahead can I make the cake?
The cake layers can generally be baked ahead and stored properly before decorating. Once decorated, keep the cake refrigerated according to the storage needs of your particular filling and frosting.
🌌 Final Thoughts
The Aurora Borealis Cake is the kind of dessert that makes people stop before taking the first slice.
It combines the drama of a midnight Arctic sky with glowing green, turquoise and purple ribbons, sparkling stars and snowy mountain silhouettes.
The secret isn’t making every detail perfect.
It’s creating contrast:
dark sky + glowing colors + tiny stars + snowy landscape.
That combination is what makes the cake feel like a miniature piece of the Northern Lights. 💚💙💜✨